Forms Personalisation
So, it's all about J2EE, right?
Well, it will be - and I am all excited by the move to the Fusion Applications platform, and its early form, Oracle Applications Framework.
But we still live in a world with Oracle Forms, and we will continue to do so for Release 12.
It's a feature that's been out just under 2 years, but this is a great venue to highlight it to make sure you're taking maximum advantage of it.
What now?
Forms Personalisation takes the Custom Library (CUSTOM.PLL) concepts and makes them much easier to implement. It is like going from a VCR to a Tivo.
CUSTOM.PLL coding is all hand-tooled PL/SQL which is controlled in a single source file, by default. It allows implementers to trap various Forms triggers and take actions based on them.
All Forms Personalisations, on the other hand, are stored as metadata, and so they are all seamlessly upgraded without needing to be re-applied or addressed - just like Flexfields or Folder definitions! Forms Personalisation provides tools to perform the same configurations, in the form of a Form. (Say that fast, huh?)
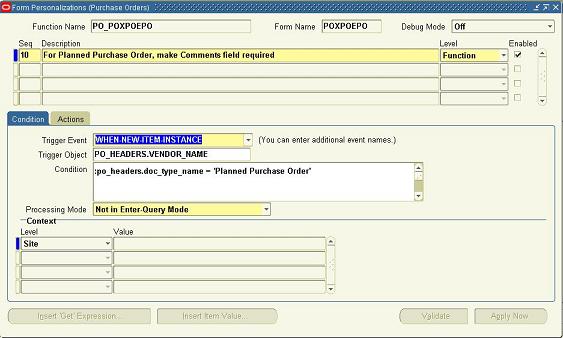
Open any Form in 11i10, and go to Help->Diagnostics->Custom Code-> Personalize. This brings up the Personalisation Form in the context of the Form and Function that you were in. This is where you build the Personalisations specific to that Form or Function.
The page has two major tabs: Conditions and Actions. Forms Personalisation is basically a big set of if-then statements that can execute because of various events that take place on that Form.
If...
Conditions determine IF a personalisation executes after a specific event or Forms trigger (including MENU or SPECIAL triggers). Triggers (WHEN-NEW-ITEM-INSTANCE, WHEN-VALIDATE, etc.) can be attached to objects, such as this example - when the user tabs out of the Purchase Order Type field into the Supplier Name field. Note that Conditions include conditional logic (only if the PO Type is 'Planned Purchase Order', e.g.), and scopes (only for Purchasing Superuser responsibility or Vision Operations organization or Joe the useless intern).
Then...
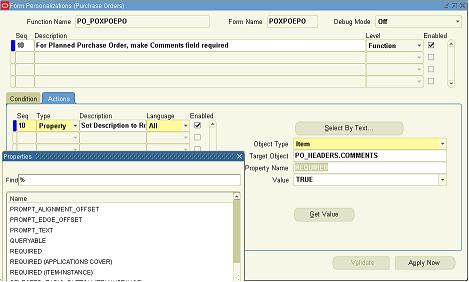
Actions are the list of specific things that you want to have happen. The major actions are:
- Builtin: Form or PL/SQL built-ins like executing a procedure, mimicking a key stroke, navigating to another function, opening a URL, etc. Very powerful indeed.
- Property: Set the Forms property value of a form item (If it's a Planned Purchase Order, set the Required property of the Description item in the PO_Header block to TRUE, e.g.)
- Message: put up a prompt warning like an OK box (cool because you can populate the message with data from screen variables, lookups, or calculations)
- Menu: Enables a special menu entry, defining its label, icon name and blocks to which it applies.
How now? (.... 'brown cow?')
Those are the basics, and I think you can see how much more accessible this power is now. It's easily managed, as well. For example, there are delivered FNDLOAD scripts for migrating these personalisations between instances (DEV > TEST > PROD), as well as entering them in version control systems.
Also, there is a central form for identifying the personalisations and turning them off! Pretty good if you completely hose up the WHEN-NEW-FORM-INSTANCE event...
Couple of last notes
Forms Personalisation receives events before CUSTOM.PLL does but then passes them normally to CUSTOM.PLL... Your existing CUSTOM.PLL logic will continue to work, but you can introduce these Personalisations first.
Forms Personalisation was tested for performance and has been found to have very low impact.
You need FND 11.5.10 minipack (FND.H), patch 3262159; alternately, it's included in ATG Family Pack H with additional niceties.
References
- Oracle Forms Personalisation: Change without Coding (James Nurthen, OpenWorld 2006, 628K PDF)
- Forms Personalisation in Oracle Applications Users Guide (Metalink Note 279034.1)

